Ever wondered how you can boost your TV or radio signal without spending a fortune? Well, let me tell ya, building a homemade Yagi antenna is one of the coolest DIY projects you can tackle. It's not just about improving your signal—it's about getting hands-on with technology and understanding how it all works. So, buckle up, because we're diving deep into the world of antennas, and by the end of this, you'll be a pro at crafting your own Yagi antenna.
Now, before we dive into the nitty-gritty, let me paint you a picture. Imagine this—you're sitting in your cozy living room, ready to binge-watch your favorite shows, but the signal keeps cutting out. Frustrating, right? That's where a Yagi antenna comes in. This bad boy is designed to pull in those weak signals and turn them into crystal-clear reception. And the best part? You can build one yourself!
Building a homemade Yagi antenna isn't just about enhancing your signal; it's about unleashing your inner engineer. Whether you're a tech enthusiast, a hobbyist, or someone who just wants better reception, this guide will walk you through everything you need to know. So, let's get started and turn that weak signal into pure gold!
Table of Contents
- What is a Yagi Antenna?
- Benefits of a Homemade Yagi Antenna
- Materials You'll Need
- Tools for the Job
- Designing Your Yagi Antenna
- Construction Steps
- Installing Your Antenna
- Tips for Optimal Performance
- Troubleshooting Common Issues
- Conclusion and Next Steps
What is a Yagi Antenna?
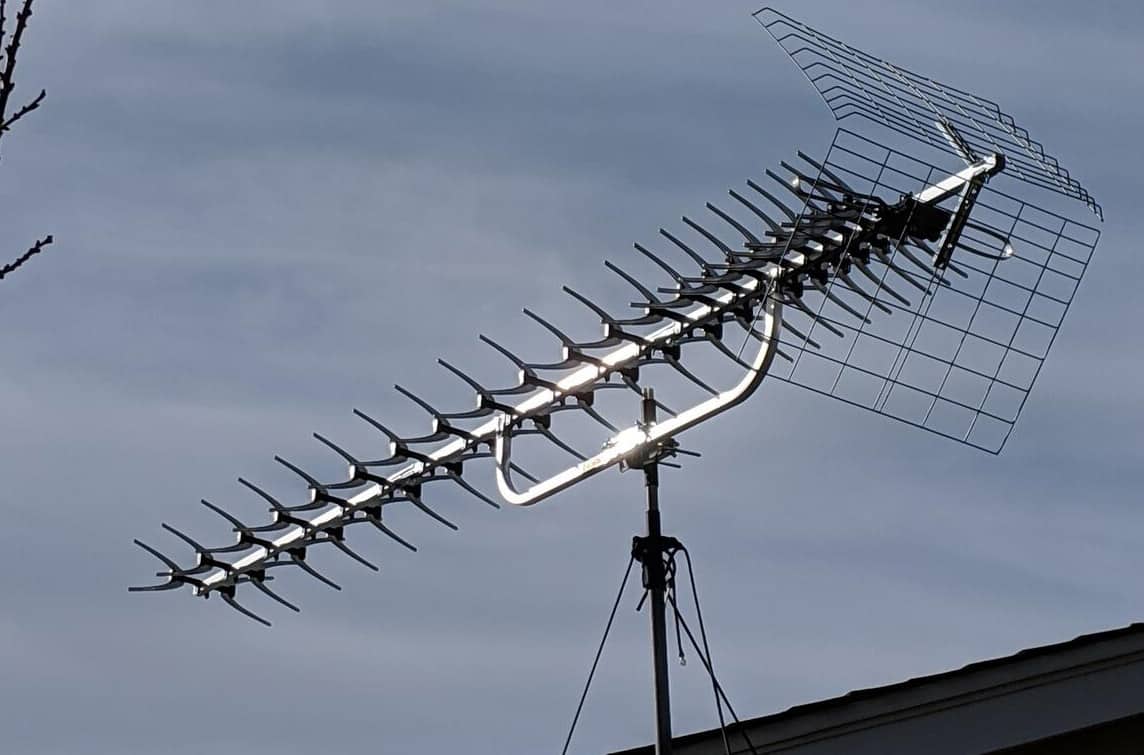
Alright, let's break it down. A Yagi antenna, also known as a Yagi-Uda antenna, is a high-gain directional antenna that's designed to pull in those weak signals from far away. It's got a unique setup with a reflector, driven element, and director elements that work together to boost signal strength. Now, when we talk about a homemade Yagi antenna, we're talking about creating this awesome piece of tech right in your own backyard.
These antennas are perfect for picking up TV or radio signals, and they're especially useful if you're in an area with weak reception. The best part? You don't need to break the bank to get one. With a little bit of know-how and some basic materials, you can build your own Yagi antenna and enjoy crystal-clear reception.
History and Background
The Yagi antenna was first developed in Japan in the 1920s by Hidetsugu Yagi and Shintaro Uda. It quickly became popular due to its high gain and directional capabilities. Over the years, it's been used in everything from amateur radio to military communications. Today, it's still a go-to choice for folks looking to improve their signal strength.
Benefits of a Homemade Yagi Antenna
Why go through the trouble of building your own Yagi antenna? Well, there are a ton of benefits. First off, it's super cost-effective. Instead of shelling out big bucks for a commercial antenna, you can create one yourself for a fraction of the price. Plus, you get the satisfaction of knowing you built it with your own two hands.
Another big advantage is customization. When you build your own antenna, you can tweak the design to suit your specific needs. Whether you're looking to improve TV reception or boost your radio signals, a homemade Yagi antenna can be tailored to fit the bill. And let's not forget the educational value—this project is a great way to learn about antennas and how they work.
Environmental Impact
Building a homemade Yagi antenna is also an eco-friendly choice. By using recycled materials and avoiding the mass production of commercial antennas, you're reducing your carbon footprint. It's a win-win for both your wallet and the planet.
Materials You'll Need
So, what do you need to get started? The materials for a homemade Yagi antenna are pretty basic, and you probably already have most of them lying around. Here's a quick list:
- Aluminum rods or copper wires for the elements
- A wooden or PVC pipe for the boom
- Coaxial cable for connecting to your device
- Insulators to keep the elements in place
- A balun for impedance matching
These materials are easy to find and relatively inexpensive. Plus, you can always get creative and use whatever you have on hand. The key is to make sure everything is sturdy and can withstand the elements if you're planning to mount the antenna outdoors.
Tools for the Job
Now, let's talk tools. You don't need anything fancy to build a Yagi antenna, but having the right tools will make the job a whole lot easier. Here's what you'll need:
- A saw or cutter for shaping the boom
- A drill for attaching the elements
- A soldering iron for connecting the wires
- A tape measure for precision
Having these tools on hand will ensure that your antenna is built to last. And remember, safety first! Always wear protective gear when working with power tools.
Designing Your Yagi Antenna
Designing your Yagi antenna is where the fun begins. You'll need to decide on the size and shape of your antenna based on the frequency you're trying to capture. A general rule of thumb is that longer elements are better for lower frequencies, while shorter elements work best for higher frequencies.
Here are some key design considerations:
- The number of director elements affects the gain and directivity of the antenna.
- The spacing between elements is crucial for optimal performance.
- The length of the driven element should be carefully calculated to match the desired frequency.
There are plenty of online calculators and resources that can help you with these calculations. Just make sure to double-check your work to ensure accuracy.
Choosing the Right Frequency
When designing your Yagi antenna, it's important to know which frequency you're targeting. Whether it's VHF, UHF, or something else entirely, the design will vary based on the frequency range. Do your research and make sure your antenna is optimized for the specific signals you want to capture.
Construction Steps
Alright, it's time to get building. Here's a step-by-step guide to constructing your homemade Yagi antenna:
- Cut the boom to the desired length using your saw or cutter.
- Drill holes in the boom where the elements will be attached.
- Insert the reflector, driven element, and director elements into the holes, securing them with insulators.
- Solder the wires to the driven element and connect them to the coaxial cable.
- Attach the balun to ensure proper impedance matching.
Take your time with each step and make sure everything is secure. Precision is key when building an antenna, so don't rush the process.
Testing the Connections
Before you mount the antenna, it's a good idea to test all the connections. Use a multimeter to check for continuity and make sure everything is properly soldered. This will save you a lot of headaches down the line.
Installing Your Antenna
Now that your antenna is built, it's time to install it. The location and orientation of your antenna are crucial for optimal performance. Here are a few tips:
- Mount the antenna as high as possible to avoid obstructions.
- Point the antenna directly at the signal source for the best reception.
- Use a sturdy mast or pole to ensure the antenna stays in place.
Once it's installed, give it a test run and see how those signals are coming in. You should notice a significant improvement in reception.
Securing the Antenna
Make sure your antenna is securely mounted to withstand wind and weather. Use guy wires if necessary and check the connections periodically to ensure everything is still tight.
Tips for Optimal Performance
Here are a few extra tips to help you get the most out of your homemade Yagi antenna:
- Keep the antenna away from large metal objects that could interfere with the signal.
- Use a preamplifier if you're in an area with very weak signals.
- Regularly clean the antenna to remove dirt and debris that could affect performance.
These small adjustments can make a big difference in how well your antenna performs. Don't be afraid to experiment and find what works best for your setup.
Troubleshooting Common Issues
Even with the best planning, things can sometimes go wrong. Here are a few common issues you might encounter and how to fix them:
- Weak signal: Check the orientation of the antenna and make sure it's pointed in the right direction.
- Interference: Move the antenna away from potential sources of interference, like power lines or electronic devices.
- Loose connections: Inspect all the connections and tighten anything that's loose.
If you're still having trouble, don't hesitate to reach out to online forums or communities for advice. Chances are, someone else has faced the same issue and can offer a solution.
Conclusion and Next Steps
Building a homemade Yagi antenna is a rewarding project that can greatly improve your signal reception. From selecting the right materials to designing and constructing the antenna, every step is an opportunity to learn and grow. And once it's installed, you'll enjoy crystal-clear reception like never before.
So, what are you waiting for? Grab your tools and get started on your DIY Yagi antenna project today. And don't forget to share your experience with others—leave a comment, share this article, or check out our other guides for more awesome DIY projects. Happy building!