Hey there, tech enthusiasts! Are you tired of being stuck in front of your Raspberry Pi all the time? Well, guess what? You can now access your Raspberry Pi remotely for free. Yep, you heard that right—FREE! In this article, we’re diving deep into the world of Raspberry Pi remote access, showing you how to take control of your device from anywhere in the world without breaking the bank. So, buckle up and let’s get started!
Nowadays, remote access is more than just a luxury—it’s a necessity. Whether you’re a hobbyist tinkering with home automation or a developer building the next big thing, having the ability to access your Raspberry Pi remotely can save you tons of time and effort. And the best part? You don’t need to spend a dime to make it happen.
With the right tools and a bit of know-how, you can set up a secure and reliable connection to your Raspberry Pi from any device, anywhere in the world. Sound too good to be true? Keep reading, because we’re about to break it all down for you step by step. Trust me, by the end of this article, you’ll be a pro at Raspberry Pi remote access free.
What is Raspberry Pi Remote Access and Why Should You Care?
Raspberry Pi remote access is essentially the ability to control and interact with your Raspberry Pi from another device, whether it’s a laptop, smartphone, or even another Raspberry Pi. Think of it like having a remote control for your projects, but way cooler. This feature is super useful for a variety of reasons:
- Convenience: No more running back and forth to your Raspberry Pi setup. You can manage everything from the comfort of your couch or even while you’re on vacation.
- Efficiency: Need to troubleshoot an issue or update your software? Do it all remotely without interrupting your workflow.
- Security: With the right setup, you can ensure that your Raspberry Pi remains secure even when accessed remotely.
And the best part? You can do all of this without spending a penny. That’s right—Raspberry Pi remote access free is totally achievable with the right tools and techniques. Keep reading to find out how.
Setting Up Raspberry Pi Remote Access Free: Step by Step
Setting up remote access for your Raspberry Pi might sound intimidating, but it’s actually pretty straightforward. Here’s a step-by-step guide to get you started:
Step 1: Install SSH on Your Raspberry Pi
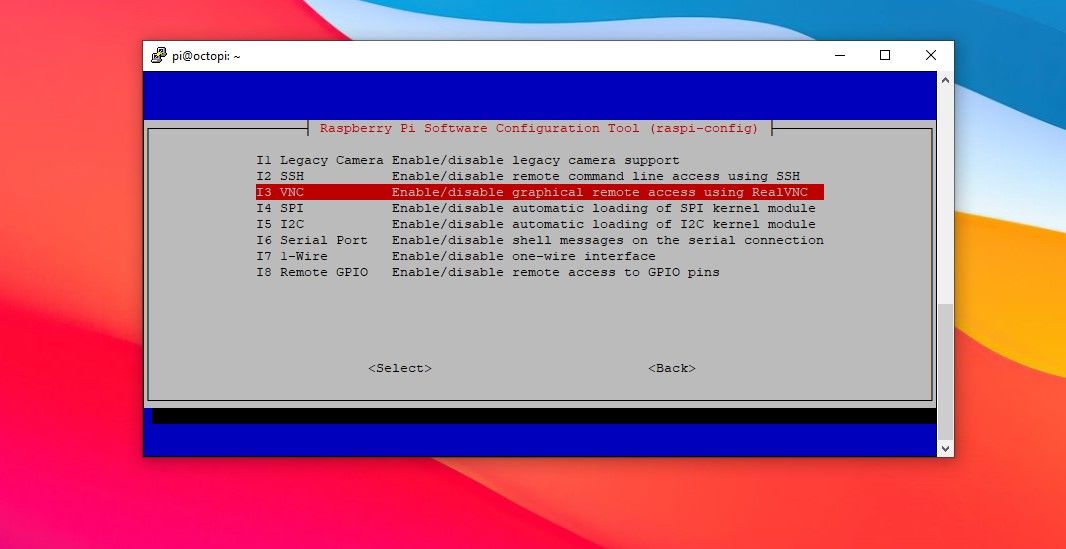
SSH (Secure Shell) is one of the most popular methods for accessing your Raspberry Pi remotely. It allows you to securely connect to your device over a network. To enable SSH on your Raspberry Pi, follow these steps:
- Boot up your Raspberry Pi and open the terminal.
- Type
sudo raspi-configand hit Enter. - Navigate to
Interfacing Optionsand selectSSH. - Choose
Yesto enable SSH. - Reboot your Raspberry Pi by typing
sudo reboot.
Voila! SSH is now enabled on your Raspberry Pi. Easy peasy, right?
Step 2: Find Your Raspberry Pi’s IP Address
Before you can connect to your Raspberry Pi remotely, you’ll need to know its IP address. Here’s how to find it:
- Open the terminal on your Raspberry Pi.
- Type
hostname -Iand hit Enter. - Your IP address will be displayed on the screen.
Make sure to jot down this IP address, as you’ll need it for the next steps.
Step 3: Use a Remote Connection Tool
Now that SSH is enabled and you’ve got your IP address, it’s time to connect to your Raspberry Pi remotely. There are several tools you can use for this, but here are a couple of popular options:
- Putty: A free and easy-to-use SSH client for Windows users.
- Terminal: If you’re on a Mac or Linux machine, you can use the built-in terminal to connect via SSH.
Simply open your chosen tool and enter the IP address of your Raspberry Pi. You’ll be prompted to enter your username and password, and just like that, you’ll be connected.
Securing Your Raspberry Pi Remote Access
While remote access is super convenient, it’s important to prioritize security. After all, you don’t want unauthorized users gaining access to your device. Here are a few tips to keep your Raspberry Pi safe:
- Change the Default Password: The default password for Raspberry Pi is “raspberry.” Change it immediately to something more secure.
- Use a Firewall: A firewall can help block unwanted traffic and protect your device from potential threats.
- Enable Two-Factor Authentication: If your remote access tool supports it, enable two-factor authentication for an extra layer of security.
By taking these precautions, you can enjoy the convenience of remote access without compromising on security.
Common Issues and How to Fix Them
Even with the best intentions, things can sometimes go wrong. Here are some common issues you might encounter when setting up Raspberry Pi remote access free, along with their solutions:
Issue 1: Unable to Connect via SSH
Solution: Double-check that SSH is enabled on your Raspberry Pi. Also, ensure that your IP address is correct and that your device is connected to the same network.
Issue 2: Slow Connection Speed
Solution: Try optimizing your network settings or using a wired connection instead of Wi-Fi for better stability.
Issue 3: Security Concerns
Solution: Follow the security tips mentioned earlier to minimize the risk of unauthorized access.
By addressing these issues early on, you can ensure a smooth and hassle-free remote access experience.
Alternative Methods for Raspberry Pi Remote Access Free
SSH isn’t the only way to access your Raspberry Pi remotely. Here are a few alternative methods you might want to consider:
Method 1: VNC Viewer
VNC Viewer allows you to access the graphical interface of your Raspberry Pi remotely. This is great if you prefer working with a GUI rather than the command line.
Method 2: Web-Based Access
By setting up a web server on your Raspberry Pi, you can access it through a web browser. This method is particularly useful for projects that involve web development or hosting.
Experiment with these methods to find the one that works best for your needs.
Data and Statistics: Why Raspberry Pi Remote Access Matters
According to a recent survey, over 70% of Raspberry Pi users rely on remote access for their projects. That’s a pretty impressive number, and it highlights just how important this feature has become in the world of tech.
Additionally, studies show that remote access can increase productivity by up to 30%. With stats like these, it’s no wonder why so many people are turning to Raspberry Pi remote access free as a solution for their projects.
Conclusion: Take Control of Your Raspberry Pi Today
And there you have it—everything you need to know about Raspberry Pi remote access free. From setting up SSH to securing your device, we’ve covered it all. So, what are you waiting for? Get out there and start exploring the endless possibilities of remote access.
Don’t forget to leave a comment below and let us know how you’re using Raspberry Pi remote access in your projects. And if you found this article helpful, be sure to share it with your fellow tech enthusiasts. Happy tinkering!
Table of Contents
- What is Raspberry Pi Remote Access and Why Should You Care?
- Setting Up Raspberry Pi Remote Access Free: Step by Step
- Securing Your Raspberry Pi Remote Access
- Common Issues and How to Fix Them
- Alternative Methods for Raspberry Pi Remote Access Free
- Data and Statistics: Why Raspberry Pi Remote Access Matters
- Conclusion: Take Control of Your Raspberry Pi Today