Hey there, tech enthusiasts! Are you ready to dive into the world of remote computing with Raspberry Pi? If you're looking to set up Raspberry Pi VNC behind a firewall and grab some free downloads, you're in the right place. This guide will walk you through everything you need to know about securely accessing your Raspberry Pi from anywhere in the world. So buckle up, because we're about to get nerdy!
Now, let's get one thing straight—Raspberry Pi VNC behind firewall free download isn't just a cool tech phrase; it's a game-changer for hobbyists, developers, and even small businesses. Whether you're tinkering with IoT projects or running a home server, being able to access your Pi remotely without compromising security is crucial. In this article, we'll break down the steps, tools, and tips to help you set it all up like a pro.
Before we jump into the nitty-gritty, here's a quick heads-up: This guide assumes you have a basic understanding of Raspberry Pi and networking concepts. Don't worry if you're a beginner; we'll keep things simple and straightforward. Let's make sure you can access your Pi from anywhere without breaking the bank—or your firewall!
Table of Contents
- What is VNC and Why Use It?
- Setting Up Your Raspberry Pi for VNC
- Understanding Firewalls and Their Role
- Securing Your VNC Connection
- Free VNC Software Options
- Step-by-Step Download Guide
- Common Issues and Troubleshooting Tips
- Performance Optimization Tips
- Real-World Applications of VNC on Raspberry Pi
- Wrapping It All Up
What is VNC and Why Use It?
VNC, or Virtual Network Computing, is like a remote control for your computer—or in this case, your Raspberry Pi. Imagine sitting at home while your Pi is humming away in another room or even miles away. With VNC, you can see its desktop, interact with applications, and manage files as if you were right there in front of it. Pretty neat, huh?
Using VNC on Raspberry Pi behind a firewall adds an extra layer of security and flexibility. You can access your Pi from anywhere in the world without exposing it to potential threats. Plus, it's free! There are tons of VNC clients and servers out there that won't cost you a dime, making it an affordable solution for remote access.
Why Choose Raspberry Pi VNC?
- Cost-effective: No need for expensive hardware or software.
- Secure: With proper configuration, VNC can be as secure as any other remote access tool.
- Flexible: Access your Pi from any device with an internet connection.
- Powerful: Ideal for running servers, IoT projects, and more.
Setting Up Your Raspberry Pi for VNC
Alright, let's get our hands dirty! Setting up VNC on Raspberry Pi is easier than you think. Here's how you can do it step by step:
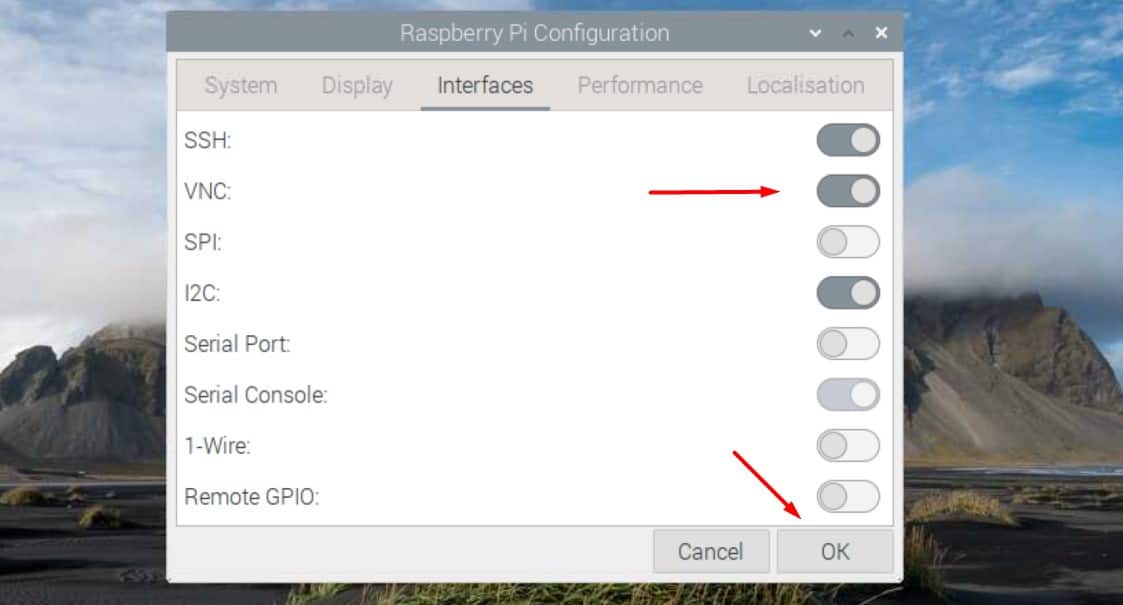
Step 1: Enable VNC on Your Raspberry Pi
First things first, you need to enable the VNC server on your Pi. To do this:
- Boot up your Raspberry Pi and open the terminal.
- Type
sudo raspi-configand hit Enter. - Navigate to "Interfacing Options" and select "VNC."
- Choose "Yes" to enable VNC and reboot your Pi.
Step 2: Install a VNC Client
Next, grab a VNC client for your device. Popular options include RealVNC Viewer, TightVNC, and TigerVNC. Most of these are free and work across platforms like Windows, macOS, and Linux.
Understanding Firewalls and Their Role
Firewalls are like bouncers at a club—they decide who gets in and who stays out. When you're setting up Raspberry Pi VNC behind a firewall, you need to configure your firewall to allow VNC traffic while keeping everything else secure.
By default, VNC uses port 5900 for connections. However, if your router or network has a firewall, you'll need to open this port or set up port forwarding. Here's how:
- Log in to your router's admin interface.
- Find the "Port Forwarding" section.
- Add a new rule to forward port 5900 to your Raspberry Pi's local IP address.
Pro Tip:
Instead of opening port 5900 directly, consider using a secure tunnel like SSH to encrypt your VNC connection. This adds an extra layer of protection and keeps your data safe from prying eyes.
Securing Your VNC Connection
Security is paramount when dealing with remote access. Here are a few tips to keep your Raspberry Pi VNC setup secure:
- Use strong passwords for both your Pi and VNC client.
- Enable encryption to protect your data during transmission.
- Limit access to specific IP addresses if possible.
- Regularly update your Pi's OS and VNC software to patch vulnerabilities.
SSH Tunneling for VNC
SSH tunneling is a powerful way to secure your VNC connection. By tunneling VNC through SSH, you encrypt all traffic between your client and server. Here's how to set it up:
- Install an SSH client on your device.
- Connect to your Pi using SSH with port forwarding enabled.
- Configure your VNC client to connect via localhost instead of your Pi's IP address.
Free VNC Software Options
There are tons of free VNC software options available for Raspberry Pi. Here are some of the best:
- RealVNC Viewer: A popular choice with excellent performance and reliability.
- TightVNC: Lightweight and easy to set up, perfect for beginners.
- TigerVNC: Offers advanced features and is highly customizable.
Each of these options has its pros and cons, so choose the one that best fits your needs.
Step-by-Step Download Guide
Ready to download and install your VNC software? Follow these steps:
Step 1: Choose Your VNC Software
Decide which VNC software you want to use. For this example, we'll go with RealVNC Viewer.
Step 2: Download the Software
Head over to the RealVNC website and download the free version of their VNC Viewer. Make sure to select the correct platform for your device.
Step 3: Install and Connect
Once the download is complete, install the software and enter your Raspberry Pi's IP address to connect. If you've set up SSH tunneling, use localhost instead.
Common Issues and Troubleshooting Tips
Even the best-laid plans can go awry. Here are some common issues you might encounter and how to fix them:
- Connection Refused: Check your firewall settings and ensure port 5900 is open.
- Authentication Failed: Double-check your passwords and make sure VNC is enabled on your Pi.
- Slow Performance: Optimize your VNC settings and ensure a stable internet connection.
Performance Optimization Tips
Want to make your VNC experience smoother? Here are a few tips:
- Lower the screen resolution and color depth for faster performance.
- Disable unnecessary desktop effects and animations.
- Use a wired connection instead of Wi-Fi for better stability.
Real-World Applications of VNC on Raspberry Pi
Raspberry Pi VNC behind firewall free download isn't just for hobbyists. Here are some real-world applications:
- Remote Monitoring: Use VNC to monitor your home security system or IoT devices.
- Web Server Management: Access and manage your Raspberry Pi-based web server from anywhere.
- Education: Teach students about networking and remote access using VNC on Pi.
Wrapping It All Up
There you have it—a comprehensive guide to setting up Raspberry Pi VNC behind a firewall with free downloads. Whether you're a seasoned pro or just starting out, VNC is a powerful tool that can enhance your Pi's functionality and accessibility.
Remember to always prioritize security and keep your software up to date. With the right setup, you can access your Pi from anywhere in the world without compromising its safety.
So, what are you waiting for? Grab your Pi, download your VNC software, and start exploring the possibilities. And don't forget to share this article with your fellow tech enthusiasts! Let's keep the knowledge flowing and make the world a little more connected—one Raspberry Pi at a time.